

There are several ways to knot a tie, but the Four-in-Hand Knot is one of the easiest and most popular. Follow these steps to achieve a classic and professional look.
Step 1: Position the Tie
- Stand in front of a mirror and place the tie around your neck.
- Ensure the wide end is on your dominant side and the narrow end is on the opposite side.
- The wide end should be about 12 inches (30 cm) longer than the narrow end.
Step 2: Cross the Wide End Over the Narrow End
- Take the wide end and cross it over the narrow end, forming an “X” shape just below your collar.

Step 3: Wrap the Wide End Behind the Narrow End
- Wrap the wide end behind the narrow end from right to left.
Step 4: Bring the Wide End Across the Front
- Bring the wide end across the front from left to right.
- This forms the front of the knot.
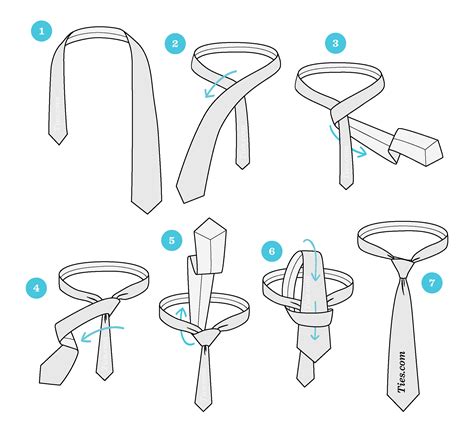
Step 5: Loop the Wide End Through the Neck Opening
- Take the wide end and bring it up through the neck opening from underneath.
Step 6: Pull the Wide End Down Through the Front Loop
- Insert the wide end through the front loop that was just created.
Step 7: Tighten and Adjust
- Gently pull the wide end down to tighten the knot.
- Adjust the tie by sliding the knot up toward your collar.
- Ensure the knot is centered and symmetrical.
Final Tips:
✅ The tip of the tie should rest at or just above your belt buckle.
✅ Adjust the knot to make it neat and snug but not too tight.
✅ Use a dimple (small crease) under the knot for a polished look.